Tuesday, January 28, 2014

Game Day Faves

Is everyone ready for game day?  I'm particularly excited for the Superbowl this year.  I still don't understand football, and don't plan to in the near future, but the superbowl is a special day.  It combines many of my favorite activities, including excessive snacking, beer drinking, hanging out with friends and/or family, and a first peek at soon-to-be viral commercials.  I mean, this year there is going to be some sort of Full House reunion during an Oikos commercial... The anticipation is literally killing me.

Here are a few of my favorite game-day recipes.  I have a few allstar criteria for the superbowl: any sort of dip, any flavor wing, anything that is buffalo flavored, anything handheld and anything that can be made in a crock pot.  Enjoy!


Saturday, January 25, 2014

KipCakes

Last weekend, I celebrated the big 2-8.  It's official: no more debating whether my age is officially mid or late twenties!  Regardless, I'm thinking 28 is going to be an excellent year.  So far, I have some wonderful weddings to look forward to, a honeymoon in St. John coming up, and a few weekend trips planned to see great friends and of course, my sister, who just moved to the ATL.  I'm really savoring my weekends as I adjust to life without a laundry list of wedding tasks. 

Instead of gifts, Mike took me out for a wonderful dinner (my favorite activity) and we later celebrated with friends at the Azalea Pre-Festival Party, which I like to claim as my birthday party year after year. After the wedding and a big Christmas, I insisted on no gifts this year, but one gift I can always count on is a KipCake. 

I'm very fortunate to have a sister who also happens to be an incredibly gifted artist.  For the past six years, without fail, she has painted me a beautiful KipCake for my birthday.  When I was in college, I had dreams of opening my own cupcakery.  It would, of course, be called the "KipCakery," thus, the evolution of my sister's 'kipcake' creations. 

This is the "28" KipCake.  The colors are fantastic - I wish they would translate better on the screen.  She used a mixture of card stock and glass beads in addition to the paint. 

This is one of my favorites (really they're all my favorite).  The soft colors mixed with the metallics and the texture of the cupcake wrapper and pearls? Beautiful 

This is the KipCake that started it all!  What's amazing is it took her all of 5 minutes to paint.  If only we could all be so lucky. 

Another one of my favorites!  My family has affectionately called me "Skipperdee" my whole life, after the turtle from my favorite children's book, Eloise.  The marble balloons add a little something special. 

This one has always reminded me of Mackenzie Childs, who designs some of my favorite dishes.  
This one is actually a paper cutout used as an overlay to the KipCake made entirely out of ribbon. 

My KipCakes are some of my most treasured possessions.  I can barely wait to see what see what she comes up with next. 

Which is your favorite?

Tuesday, January 21, 2014

Chicken Pot Pie with Cheddar Biscuit Crust


As the polar vortex slowly but surely encroaches upon our little coastal town, I've got my mind on  my favorite Pottery Barn blanket and a warm, buttery chicken pot pie.

I was raised in a house divided.  My sister, Laura, insisted her chicken pot pie be topped with a flaky puff pastry.  Me? I'm all about a fluffy, cheesy biscuit.  The type that slowly soaks up the savory pie filling and adds an extra layer of richness.

This is a special recipe that my crafty mother put together to accommodate my biscuit-related demands.  She uses my grandmother's recipe for cheddar biscuits atop a thick, creamy filling and the combination is unbeatable.


I used to bake the biscuits directly on top of the pie filling, but I find that it's hard to tell when the biscuits are done because they absorb so much moisture as they bake.  Partially pre-baking them is the perfect solution.


Ingredients:
Biscuits:
* 2 c. flour
* 1 tbsp. baking powder
* 1 tsp. salt
* 1 c. shredded cheddar cheese
* 4 tbsp. shortening (crisco)
* 1 c. cold milk
* 1 tbsp. butter, melted

Filling:
* 2 c. cooked chicken (I use a rotisserie chicken), cut into chunks
* 2 c. chicken stock
* 1 c. chopped carrots 
* 1 small yellow onion (or 1-1.5 c.), chopped
* 3 tbsp. butter
* 3 tbsp. flour
* 3/4 c. frozen peas
* 1/2 c. heavy cream
* salt, pepper

Preheat the oven to 375.  Spray a cookie sheet with cooking spray; set aside. To prepare the biscuits, combine flour, baking powder, salt and shredded cheese in a bowl.  Use a fork or pastry cutter to cut in the shortening until you have small, course crumbs the size of peas.   Slowly add in the milk and stir with a wooden spoon until the dough comes together.  Lightly flour your hands and form the dough into 6 biscuits.  Bake for 15 minutes while you prepare the filling. 

Add 1 tbsp. butter to a large saute pan over medium heat.  Add the carrots, cover, and cook 5 minutes or until the carrots are mostly tender.  Add an additional tablespoon of butter along with the onions and saute, uncovered, until the onions are translucent (5 more minutes).  Add the remaining tablespoon of butter to the pan, then stir in flour.  Cook the flour, stirring constantly, for 1 minute or so.  Increase the heat to medium high and add the chicken stock to the pan, bringing the mixture to a boil. When the filling has thickened (2-3 minutes later), add the chicken, peas (directly from the freezer is fine), and heavy cream.  Season generously with salt and pepper. 

Brush the tops of the biscuits with melted butter.  Place the biscuits on top of the filling and return the pan to the oven for 8 minutes.  I used my cast iron enamel skillet, which is ovenproof, but if yours is not, transfer the filling to a baking dish and top with biscuits.  Serve immediately.  Enjoy! 


Friday, January 17, 2014

App Love: Next Issue

So I found this new app that I'm sort of obsessed with and just have to share.  

Magazines are my guilty pleasure.  I just love when my Us Weekly arrives on Friday afternoons, and I love it even more when I find my highly anticipated Food Network Magazine in the mailbox.  

It just so happens that while I was flipping through my FNM, I saw an add for a free 30 day trial of Next Issue. Next Issue gives you access to over 100 magazines, AND back issues.  The standard subscription is 9.99 a month, or you can go for the premium subscription at 14.99, which includes my third favorite guilty pleasure, People. 


I absolutely love food magazines, but the problem is I hoard them.  In my mind, they're basically a mini cookbook- so how could I throw them away?  I've convinced myself that subscribing to Next Issue is very green of me.  Of course, I'm not giving up my FNM, but now I can peruse Cooking Light, Bon Appetit, Food & Wine, Rachael Ray (the list goes on!) and just screen cap my favorite recipes. 

Ah, the joys of technology.

Monday, January 13, 2014

Salmon & Quinoa Salad

I'll be the first to admit it: I'm usually the last person on board with food trends.  Quinoa is no exception.

After a particularly indulgent weekend, I found myself actually craving something light and healthy on Sunday night.  Now, you can probably tell from reading this blog, but that is actually quite rare for me.  My cravings are typically equally distributed between complex carbohydrates and red meat.  Anyway, I won't get into the dirty details (Ruth's Chris onion rings and a ginormous order of Pizzetta's spaghetti and meatballs were involved), but by Sunday I was jonesing for some greenery.


Now back to Quinoa.  I don't know why I resisted it for so long - I mean, it's like sooo hot right now.  And people describe it with fancy phrases like "antioxidant powerhouse" and "nutrient rich." I decided my first quinoa adventure would be an attempted reproduction of my favorite Salmon & Quinoa salad at Printwork's Bistro in Greensboro.


If you're new to Quinoa, or, like me, trying to convince you're significant other that it's delicious, adding it to a salad is a great way to ease into the quinoa-hype.  In this recipe, the quinoa just adds a light coating and unique texture to the lettuce, without being overwhelmingly grain-y (though really it's a cereal.. ).  Add some crispy sweet potatoes and you have a wonderful flavor combo and a simple dinner you can feel good about.


Ingredients (serves 2): 
* 2 salmon filets
* 1 sweet potato, diced
* mixed greens
* 1/4 c. quinoa
* 2 tbsp. olive oil, divided 
* Salt, Pepper
Mustard Vinaigrette:
* 1 tsp. dijon mustard
* 1 tsp. whole grain mustard
* 2 tbsp. white wine vinegar
* 1/2 c. olive oil
* Salt, Pepper

Preheat oven to 425.  Add the diced sweet potatoes to a small casserole dish and coat with 1 tbsp. oil, salt and pepper.  Roast for 40 minutes, stirring once about halfway through; set aside. 

Increase the oven temperature to 450.  Prepare the quinoa according the package directions.  Meanwhile, prepare the vinaigrette.  Combine mustards, white wine, salt and pepper in a bowl. While whisking the mustard mixture, slowly pour in the olive oil and continue to whisk until the dressing is well combined.  

Preheat an ovenproof saute pan to medium high heat.  Add a tablespoon of olive oil to the pan and season the flesh side of the fish with salt and pepper.  Add the fish, skin side up, to the pan.  Sear the flesh side of the fish, then flip it, spoon 1 tbsp. of vinaigrette over each filet, and place the pan in the oven for 3 minutes for medium rare (I prefer my salmon slightly well done, so I bake it for 5 minutes).  

To prepare the salad, toss salad greens with quinoa and a few tablespoons of dressing (you just want a light coating).  Add the salad to a bowl and top with crispy sweet potatoes and salmon.  Enjoy! 


Friday, January 10, 2014

Profiteroles


When I was in high school, way back yonder, all seniors were required to complete a month long internship of sorts called the 'senior project.'  Senior projects were amazing - no class for an entire month? Sign me up. 

While my classmates were shadowing their favorite doctors, lawyer, and interior designers, I had a different idea.  Sure, I went on to get my degree in Finance, but I could not think of anything less interesting than spending a month of my senior year filing papers and fetching coffee for some banker.  Instead, I headed over to the beautiful Green Valley Grill, inside Greensboro's O.Henry Hotel, and begged the general manager to let me follow around the pastry chef for a month.


I can only imagine how thrilled the entire kitchen staff of men was to have a 17-year old cheerleader following them around like a lost puppy, but I set out to prove my worth.  Fill this 5-gallon bucket with creme brulee custard? On it.  Make me 8 chocolate layer cakes before you leave? Not a problem.  But my favorite thing to make was Choux Pastry.


Choux Pastry is incredibly versatile.  At the hotel, we used it to make spicy black pepper cheese puffs, cream puffs filled with unique flavors that changed daily, and my favorite: profiteroles. Profiteroles (halved puffs filled with vanilla ice cream) are both incredibly easy to make and also incredibly impressive.  It's one of my favorite desserts to order in a restaurant because more often then not, it includes 'tableside hot fudge' in the description.  I mean..right?


Once you master this simple pastry dough, the possibilities are endless!

*This recipe is adapted from the Good Housekeeping Step-by-Step Cookbook

Ingredients:
Basic Choux Pastry
* 1/2 c. butter
* 1/4 tsp. salt
* 1 c. flour
* 4 eggs
* Ice Cream and Hot Fudge Sauce (recipe below), for serving profiteroles

Preheat oven to 400.  In a saucepan, bring butter, salt, and 1 cup of water to a boil over medium heat.  Remove the pan from the heat and stir in flour with a wooden spoon until the dough starts to pull away from the side of the pan and form a ball.  Add eggs to the flour mixture one at a time until the mixture is smooth and shiny.

Grease and flour a cookie sheet.  Use a spoon to drop batter into 8 mounds (roughly 1/4 c. each).  Wet your finger and gently smooth the tops (the peaks tend to burn).  Bake for 40 minutes, or until golden.  Remove the puffs from the oven and use a sharp knife to poke a small hole in the side so the steam can escape.  Turn off the oven and place the puffs back inside for 7 minutes.  Cool the puffs on a wire rack.

To serve, slice the puffs in half with a serrated knife, fill with a scoop of vanilla ice cream, replace the tops and drizzle with hot fudge sauce.

Hot Fudge Sauce:
* 4 oz. unsweetened chocolate bar
* 3/4 c. sugar
* 2 tbsp. light corn syrup
* 1 c. heavy cream
* 2 tbsp. butter
* 2 tsp. vanilla

Combine chocolate, sugar, corn syrup, and cream in a sauce pan.  Bring to a boil over medium heat, stirring constantly.  Boil for 3-4 minutes, or until the sauce has thickened.  Remove from heat and stir in butter and vanilla.  Serve immediately, or let cool completely and refrigerate until needed.


Sunday, January 5, 2014

Beef Burgundy

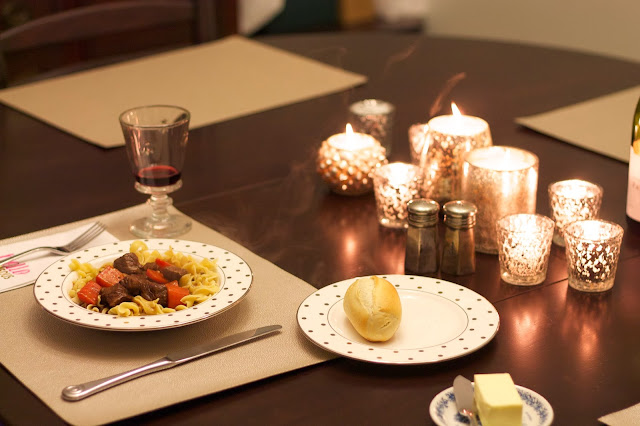
Beef Burgundy has a special place in my heart.  This is - hands down - my favorite dish that my mom makes.  It's the ultimate comfort food: beef, carrots and onions in a rich, flavorful red wine broth over egg noodles.  What could be better on a cold winters night?


Last night, I made this for Mike for a nice date night at home.  He absolutely loved it and it's great because you can clean up all the dishes while the beef burgundy is simmering away- making it perfect for a relaxing dinner at home.  


Ingredients:
* 1.5 lb.. sirloin steak (I bought a package of 2 sirloin filets), cut into 1 inch pieces
* 1 white onion, roughly chopped
* 1 lb. carrots, peeled and roughly chopped
* 1 c. burgundy wine (or substitute pinot noir)
* 3 c. beef broth
* 1 garlic clove, minced
* 1 bay leaf
* dash of Worcestershire
* 2 tsp. browning sauce (this is with the gravy and packet sauce mixes at the store)
* 2 tbsp. olive oil
* 2 tbsp. butter
* 2-4 tbsp. flour
* salt, pepper
* egg noodles, for serving

Begin by browning the meat and vegetables.  First, pat the meat dry with a paper towel and season generously with salt and pepper.  Preheat a dutch oven to medium high heat.  Add olive oil and 1 tbsp. butter.  Add half the meat to the pan and brown on all sides (no need to cook through, you just want to seer the meat).  When the first batch is done, remove it from the pan and set aside on a plate.  Repeat with the second batch of meat, then the carrots, adding more butter and olive oil if needed.  

When the carrots are browned, set them aside with the meat, reduce the heat to medium low and add the onions.  Sauté the onions until they're soft and slightly brown, then add garlic to the pan and sauté for one minute.  Add two tablespoons of flour to the pan and cook one more minute to remove the raw flour taste, stirring well. Add the red wine to the pan and scrape up any brown bits with a wooden spoon.  Bring the wine to a boil, stirring often, for 3-4 minutes until it's slightly thickened.  Add the beef stock, return the meat and carrots to the pan, then add bay leaf, worcestershire and browning sauce.  Reduce heat to low, cover, and let simmer 1.5-2 hours, or until the meat is tender. 

To thicken the sauce before serving, spoon 3 tbsp. of the cooking liquid into a small bowl.  Add two teaspoons of flour to the small bowl and mix it well with a fork to dissolve any lumps.  Bring the beef mixture to a boil and add the flour mixture, stirring well to incorporate it.  Repeat until desired thickness is is reached (I only did this once - the beef burgundy will be slightly thinner than a traditional beef stew). 

Serve over egg noodles.  Enjoy!