Wednesday, December 17, 2014

Perfect Prime Rib

Monday night I had a few friends over for a meat feast. Literally, so much meat. Mike has been talking so much about the Christmas Eve Prime Rib we're having at his Mom's house, that the craving became too much for me to bear.  I've always wanted to try making my own, so I thought a festive pre-holiday dinner was in order.

Cooking a large, expensive cut of meat can be intimidating, but it really is super simple.  You absolutely must have a meat thermometer, or it will be very easy to over or under cook.  Mine is similar to this one and I really prefer this type because you can monitor the temperature of the meat from outside the oven, without constantly opening it and releasing all of the heat. 


This ended up being one of the easiest dinner parties ever.  I just popped the meat in the oven, made creme brûlée the day prior, and my friends brought a delicious salad with homemade asian dressing, Ina Garten's Cauliflower Gratin (which will easily convert even the most strong-willed cauliflower haters), and mashed potatoes.  For an appetizer, I spooned some of my leftover bacon jam on some brie and warmed it in the oven, served with crackers. 

I kept the table pretty simple.  I filled a trifle bowl with party crackers (which really make any holiday party better) and candy canes for the center piece.   


 For the table setting, I used my Pottery Barn reindeer plates, and C.Wonder jingle bell napkin rings (sold out but similar options at Williams-Sonoma). 


I used the Pioneer Woman's suggestion for cook times and, as usual, she did not disappoint!


Ingredients (serves 8-10, total cook time about 2.5 hours):
*8 lb. boneless rib roast
*1 stick butter, at room temperature
*1 heaping tbps. fresh rosemary, chopped
*1 heaping tbsp. fresh thyme, chopped
*1 tsp. garlic powder
*1 tsp. onion powder
*salt, pepper

Au Jus
*2 c. beef broth
*1/2 c. red wine
*1 tbsp. soy sauce
*5-6 dashes worcestershire sauce

Let the meat come to room temperature for 30-45 minutes.  Meanwhile, make the herb butter.  Combine butter, rosemary, thyme, garlic powder, and onion powder in a bowl.  Pat the meat dry and rub the herb butter all over it.  Season generously with salt and pepper.

Preheat the oven to 500 and move the rack to the lowest position.  Roast the meat for 45 minutes (I would suggest leaving the oven closed - the butter will smoke a lot as it cooks, which helps create a nice sear on the meat).  

Reduce the oven temperature to 300. Insert a meat thermometer sideways in the beef.  Return to the oven and cook 1 hour 15 minutes to 1 hour 30 minutes, or until the meat thermometer reads 128 (the PW recipe says 120-135 degrees, so I chose 128 and it rested to the perfect temperature!).  Remove the meat from the oven and let rest for 15 minutes, or until it reaches 135 for medium rare*.  

To make the Au Jus, remove the meat from the roasting pan and drain off most of the fat, leaving just a thin layer.  Add all ingredients for Au Jus recipe and set over a burner on the oven.  Bring to a boil, whisking often, and continue to boil for 5-10 minutes, or until it reduces by about a third.  Serve on the side.  Enjoy! 

*I found 135 to be the perfect temperature, with rare pieces in the center, and a few medium pieces on the end. 


Sunday, December 14, 2014

Chocolate Creme Brûlée

Happy Monday Friends!  I'm more excited by Monday than usual (which doesn't take much) because I'm having a few friends from work over for a festive holiday feast tonight.  Obviously, I love a good dinner party, but the holidays make everything feel that much more exciting. 

When I'm cooking, dessert is usually an afterthought.  I get so focused on appetizers and sides that dessert is typically assigned to a guest or just nonexistent. This time, a few friends are bringing sides so I had more time to think of something festive to serve. 


Creme Brûlée is the perfect party food.  This chocolate version adds a decadent twist on the classic, creamy custard, and of course has that burnt sugar crust we all know and love. 


The best part is that Creme Brûlée, besides the simplicity of making it,  is that it's the perfect make-ahead dessert.  I made it yesterday, chilled it, and then tonight each guest can brûlée the top off their own dessert.  Let's be honest, the opportunity to play with fire just took your dinner party to a whole new level. 


Ingredients (Serves 10, can easily be halved):
*1/2 c. + 1/3 c.sugar, divided, plus more for the cooked custards
*4 c. heavy cream
*6 oz. bittersweet chocolate (about a cup of chips)
* 10 egg yolks

Preheat the oven to 250, and set some water to boil on the stove.  In a separate sauce pan, combine heavy cream and 1/2 c. sugar.  Heat over medium low, whisking constantly, until sugar dissolves.  Reduce heat to low and whisk in chocolate.  Continue whisking until the chocolate is totally combined. 

In a bowl, combine egg yolks with 1/3 c. sugar and whisk well.  While whisking, add 1/2 c. of the warm chocolate cream mixture to the eggs (this is called tempering the eggs - slowly warming them so they don't scramble).  Continue adding chocolate a little bit at a time, then add the rest once the egg yolks and chocolate mixture is slightly warm. Whisk well to combine. 

Transfer chocolate mixture into 10 (4 oz.) ramekins. Add the ramekins to a casserole dish, then pour boiling water into the pan so that it reaches about half way up the ramekins (this is called a water bath, which helps custards cook through without cracking), being careful not to splash any water in the custard dishes. 

Bake until the custard just sets (between an hour and an hour and 15 minutes).  Remove the custards and let cool on a wire rack.  Transfer to the refrigerator to chill. 

To serve the creme brûlée, sprinkle 1 teaspoon of granulated sugar on top of each dish.  Use a kitchen torch, continuously moving back and forth, to burn the sugar.  Enjoy!


Wednesday, December 10, 2014

Life Lately

I'm sorry to report I don't have a second recipe to share this week, but i've been a bit preoccupied by the newest addition to my family.  I have to introduce you to this handsome stud, Wilkie the Westie.  If you know me, you know that i've been talking about getting a Westie for the better part of a decade.  I always talk myself out of it at the last minute because a puppy is so much responsibility, and I have also worried about our Chocolate Lab, Roscoe's, feelings, but once I met this guy, there was no turning back.

Sweet Wilkie is a sassy little guy.  I've only had him 6 days now and he's already learned so much.  He's conquered the stairs, jumped off the big bed (though i'm sad I can't contain him there anymore when I'm getting ready) and painstakingly tried to win over his big brothers heart.  I wouldn't say they're besties yet, but he sure is trying.

I also went to my first Ugly Christmas Sweater party last weekend.  How was that my first?! It was SO much fun.  I absolutely loved the idea of this homemade photo both.  Mike won for ugliest sweater - he earned it with that disaster of a sweater.  He was so proud!

We also celebrated our one year anniversary Sunday. Holy Moly, it's true what they say - time flies!! Our wedding cake was just as delicious one year later. We celebrated with a lazy day (well, as lazy as you can be when you're taking a puppy outside every hour), homemade beef stroganoff, and wedding cake.


In other news, Mike gave me one of my Christmas presents earlier.  It's a record of the Nutcracker and i've been listening to it nonstop.  You just can't be sad, even when you're cleaning up the kitchen, when the nutcracker is playing. 


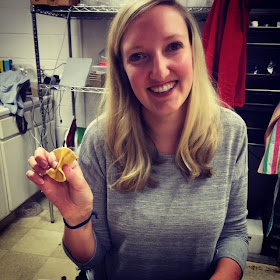
Locals, I recently took a cooking class at La Gemma. SO much fun - I would highly recommend it.  You can't beat learning how to make fresh pasta from a real Italian in her kitchen.  The classes fill up quickly so be sure to sign up.  The class size was small and it's totally hands on.  Bring wine and an appetite!


As I'm about to sign off Wilkie is laying on the edge of my computer and just got his first hiccups.  Eeek, I can't stand the cuteness.  If he gives me a break this weekend I'll be back next week with a new recipe! XO.

Monday, December 8, 2014

Bourbon Bacon Jam

I feel like I don't even need to write an intro to this recipe.  Bourbon Bacon Jam.  People-it's real, and you need it in your life.


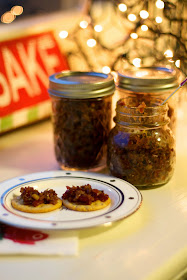
I was debating the best way to serve this when I photographed it, but the truth is, there can be no best way.  Sweet, sticky, salty jam, filled with bacon, maple, and of course the kicker, bourbon? There are just so many options.  I'm taking this jam to my work pot luck with crackers, goat cheese and cheddar cheese.  I'm saving some for myself to serve on burgers, waffles, inside a grilled cheese, or straight up with a spoon whenever I need it. 


Originally inspired by Martha Stewart's Bacon Jam recipe, this recipe is just a slightly different version using Applewood Smoked Bacon and Apple Cider Vinegar.  The flavors are just out of this world. If you can handle sharing, it would basically make the best gift ever.  Include a stylish tag and a note to keep refrigerated for up to 4 weeks.  Enjoy! 

Ingredients:

* 1.5 lb. applewood smoked bacon, chopped in 1 inch pieces 
* 2 c. finely chopped shallots (I got this from 3 large shallots)
* 4 garlic cloves, minced
* 1 tsp. chili powder
* 1 tsp. ginger paste (from the refrigerated herb section)
* 1 tsp. dijon mustard
* 1/2 c. bourbon
* 1/4 c. maple syrup
* 1/3 c. apple cider vinegar
* 1/3 c. packed light-brown sugar

Heat a large skillet to medium heat.  Add bacon (in batches if necessary*) and cook until just brown (about 20 minutes).  Remove with a slotted spoon and set aside on a paper towel to drain.  Drain all but a light coating of bacon grease, and add shallots and garlic to the pan and sauté until translucent (5-6 minutes).  Add chili powder, ginger paste, and dijon mustard, and stir well to combine. 

Increase heat to high and add the bourbon and maple syrup.  Bring this mixture to a boil, then add the cider vinegar and brown sugar and return to a boil.  Add the bacon, reduce the heat to low, and simmer for 10 minutes or so until the mixture is syrupy.  

Transfer to a food processor and pulse until you have a slightly chunky jam.  Refrigerate and store for up to 4 weeks.  Enjoy! 


*If you need to cook in multiple batches, drain the grease off in between each new batch. 


Tuesday, December 2, 2014

Gifts for the Wino

Well it's official, holiday shopping is in full swing!  I would venture to say I consider myself a wine-o, so I pulled together some fun stocking stuffers and gifts for the wine-os in your life.  

I was particularly intrigued by the set of wine the stemware plate clips - they clip to the side of a plate so you can park your wine glass on it while you enjoy your food! Clever, right?

My Christmas wish list also includes a subscription to Wine Awesomeness, which is a monthly service that delivers three bottles of wine right to your door.  You can specify if you want all whites, reds, or mixture, and you can gift one or multi-month subscriptions. The gift that keeps on giving !
Gifts for the Wino

Sunday, November 30, 2014

Braised Beef Pappardelle

Happy Monday friends!  I hope everyone had a nice long weekend and had the opportunity to indulge in some delicious food.  I had a great time in Florida, although it was quite colder than I was expecting. Relaxing and spending time with family was so much fun, and returning home to two gorgeous trees just waiting to be decorated was the icing on the cake. 

I'm in full wintry-holiday spirit, and even after all of the food I ate last week, i've got decadent, rich, comfort food on the brain.  Decadent and rich doesn't even begin to describe the magic that is this braised beef pappardelle. This dish will positively warm you from the inside out.  Inspired by my favorite dish at a long-gone Wilmington restaurant, the Kitchen, this pappardelle is firing on all cylinders.  The beef is beyond tender, the sauce thick and velvety, and the flavors are that special kind of savory that you can't quite put your finger on.  I finally mastered the sauce after adding a parmesans rind, bunches of fresh herbs, and just a touch of tangy tomato paste. 

Don't be intimidated by the lengthy instructions.  Most of the cooking time (about 4 hours total) is hands-off.  The key is to slowly braise the beef in the oven until it practically falls apart when you look at it. 

Ingredients:
* 2 lb. beef stew meat
* 2 tbsp. olive oil
* 4 tbsp. butter, divided
* 2 onions, sliced
* 4 carrots, cut into chunks
* 2 cloves garlic, minced
* 1 tbsp. tomato paste
* 4 tbsp. flour, divided
* 1 c. red wine (I used cabernet)
* 32 oz. beef stock
* 1 parmesan rind
* 1 bay leaf
* 1 bunch of herbs (I used 2 sprigs rosemary, 4 sprigs thyme)
* salt, pepper
*1 lb. pappardelle pasta

Preheat the oven to 325.  In a large dutch oven, heat 2 tbsp. olive oil and 1 tbsp. butter over medium high heat.  Pat the meat dry with paper towels and season generously with salt and pepper.  Working in batches, brown the meat on all side, being careful not to overcrowd the pan (or the meat will steam instead of brown).  Remove browned meat to a plate and set aside. 

Add onions and carrots to the pan and sauté for 2-3 minutes, or until they just start to brown.  Add garlic to the pan and sauté until fragrant; 1 minute or so.  Add 1 tbsp. flour and tomato paste to the pan and cook for 2 minutes.  Add the wine to the pan and cook until thickened, 2 minutes or so.  Add beef stock, parmesan rind, bay leaf, and herbs, and cover with a tight fitting lid.  Transfer to the oven and cook for 3 to 3.5 hours, or until the meat is fork tender. Leave the remaining butter out so it can come to room temperature while the beef is braising. 

Remove the herbs from the pot.  The next step is to thicken the sauce.  Prepare a beurre manie - this is a mixture of equal parts butter and flour, used to thicken sauces, by combining 3 tbsp. flour and 3 tbsp. room temperature butter in a bowl.  Use a fork to mash the butter and flour together, ensuring they're totally incorporated. Use a strainer (I used a hand spider, but a colander works just as well) to drain the sauce from the solids (all of the solids will be added back to the pot - straining them out just makes it easier to create a thick, smooth sauce).  Heat the sauce over medium high heat, and whisk in the beurre manie (this makes a thick, rich sauce; for a thinner consistency, start with half the beurre manie).  Continue to whisk until smooth and the sauce has thickened.  Return the meat to the sauce and reduce heat to low until ready to serve. 

Prepare pasta according to package directions.  Stir cooked pasta into the sauce and serve.  Enjoy! 


Wednesday, November 26, 2014

NORDSTROM Giveaway!

So I know I said  I was signing off for the week, but I had to come back for a hot minute and share this awesome giveaway!  If you already follow me on Bloglovin, Facebook, or Google Friend Connect, you already have a shot - just enter below, and discover some other great blogs as well!

Let's be honest, Nordstrom has something for everyone, whether you're working on your Christmas shopping or in the mood to treat yourself.  

Good luck! 

:::Brought to you by:::
 Becca // Shane // Nicole // Mary
Jamie // Samm // Magen // Kippy
Morgan // Katie // Cat // Lauren
Caley // Sarah  
  
a Rafflecopter giveaway

Sunday, November 23, 2014

Holiday Oyster Roast

Happy  Monday and happy Thanksgiving week!  If you, like many of us, suffer from a little post holiday cabin fever, consider hosting a little post-turkey-day Oyster Roast.

For this month's issue of Focus on the Coast, I teamed up with the owner's of Wilmington's famed Hieronymus Seafood to learn all about how to host the perfect oyster roast (yeah, I rhymed).  


Photos by Jason Armond for Focus the Coast

Photos by Jason Armond for Focus the Coast

Photos by Jason Armond for Focus the Coast

How beautiful did the pictures turn out?  Head on over to Focus on the Coast for some tips on everything from creating the perfect menu, to preparing and serving your oysters. 

I'm signing off for a week of gluttony and relaxation.  Cheers, and see you next week! 


Friday, November 21, 2014

Thanksgiving Menu

Is everyone ready for turkey day?  I know I am!  This year I'm heading to sunny Florida to spend the holiday with my Mom's side of the family.  I can't wait for a little warm weather, lots of turkey, naps, and good family fun. 

This year, I had my annual Friendsgiving fairly early so we could celebrate with my friend Stephanie one more time before she moved to Japan.  


I like to keep my menu pretty traditional. Here are a few of my turkey day faves:


Tuesday, November 18, 2014

Garlic-Herb Pull Apart Rolls

When I break out my bread maker, whip up a homemade sourdough, and enjoy the yummy smells wafting through my house as the dough rises and bakes, there's just nothing better. 

But let be honest, nobody has time for that on the regular.  Homemade bread is a special occasion/weekend project for this girl. 

These delicious pull apart rolls add a homemade twist to a store-bought staple.  Start with a canned biscuit, cut into quarters, and roll in a flavorful mixture of butter, olive oil, fresh herbs, and garlic, and even you might forget there's a canned biscuit in there.  These will take you all of three minutes to get in the oven, and the best part is no one has to know! 


Ingredients:
* 1 can of refrigerated biscuits (I used Grands Butter Biscuits)
* 2 tbsp. olive oil
* 1 tbsp. butter
* 1 tbsp. thyme, chopped
* 1 tbsp. rosemary, chopped
*1 tsp. garlic (1-2 cloves), minced
* salt, pepper

Preheat the oven to 350.  Cut each biscuit into quarters and spray a muffin pan with cooking spray.  

In a skillet, combine butter and olive oil over medium heat.  When the butter has melted, add garlic, thyme, rosemary, salt and pepper, and sauté for 1-2 minutes, or until the garlic is fragrant.  Remove from the heat.  Roll each quarter of dough into a ball, then add each ball to the pan of garlic oil.  Cover all sides of the dough, then add three dough balls to each muffin tin.  Bake for 12-15 minutes, or until the rolls are golden brown.  Enjoy! 


Sunday, November 16, 2014

Autumn Bruschetta

I don't know if it's the bazaar-ly cold weather or the excessive Christmas ads on tv, but I find myself in the Christmas spirit already. I'm just itching to bring my holiday decorations down from the attic, and yesterday I even found myself slightly embarrassed that I still have a glass pumpkin shaped bowl full of gourds on my kitchen table.  

But wait…. Thanksgiving hasn't come yet!  It's still fall!  To adjust my seasonal confusion, I thought I'd make a nice fall dish.  I bring you: Autumn Bruschetta. 


Layers of sweet and savory flavors just taste like fall in one bite.  I pureed sweet roasted butternut squash with a bit of chicken stock and parmesan to enhance the flavors.  For the second layer, brown sugar caramelized onions.  And to top it off?  Tangy, savory bleu cheese.  


For a make-ahead Thanksgiving appetizer, prepare the squash puree and caramelized onions a few days in advance, and assemble on the big day.  

Ingredients:
* 1 baguette, sliced
* 3 c. butternut squash, cubed
* 1/3 c. chicken stock
*2 tbsp. parmesan cheese
* 1 sweet onion, thinly sliced
*1 tbsp. thyme
*1 tbsp. olive oil
*1 tsp. brown sugar
*3 oz. creamy blue cheese
*cooking spray (preferably olive oil)

Preheat the oven to 400. Arrange butternut squash  on a baking sheet and spray generously with cooking spray.  Season with salt and pepper and bake for 30-35 minutes, or until soft and lightly golden brown.  Set aside to let cool slightly before pureeing. 

To caramelize the onions, heat a sauté pan to medium heat and add the olive oil.  Add the onions to the pan and cook for 30-40 minutes, or until caramel in color (stir often and reduce heat to medium low if the onions start to brown quickly).  Season with salt, pepper, and add brown sugar and thyme. 

Add the sliced baguette to a sheet pan and toast in the 400 degree oven for 5 minutes, or until slightly dry and toasted.  

Puree the squash, chicken stock, and parmesan cheese together in a food processor or blender until mostly smooth. 

To assemble the bruschetta, spread the squash puree on each baguette slice, top with caramelized brown sugar onions and crumbled blue cheese.  Serve as is, or return to the oven for 3-4 minutes if you prefer the cheese to be melted.  Enjoy! 

Tuesday, November 11, 2014

Shaved Brussels Sprout Salad

Brussels sprouts are one of those vegetables that has a bad rap, and I won't lie, I get it.  If they aren't properly cooked, they can have a bitter, harsh flavor.  That's why I like to cook them with bacon, or something equally as delicious. 


I've been seeing a lot of shaved brussels sprouts salads lately, and i've been eager to try a recipe out myself.  If you're not a brussels sprouts fan, this salad just might win you over.  The thinly sliced, raw brussels sprouts have a very mild flavor and a wonderful texture.  When paired with my tangy cider vinaigrette, sweetened with chewy craisins, and topped with pecans for a little crunch?  It's down right irresistible 


With it's bright colors and fall flavors, this is a great addition to the Thanksgiving table, or any Fall meal at that.  Next time I make it I might try shredding in a green apple or cabbage - the possibilities are endless! 

Ingredients:
* 1 lb. brussels sprouts
*1/4 c. craisins
*1/4 c. pecans or walnuts, roughly chopped

Dressing:
*1 (heaping) tsp. whole grain mustard
* 1 tbsp. apple cider vinegar
* 3 tbsp. olive oil
* salt, pepper
*1/4 tsp. sugar

Prepare the dressing by whisking together all ingredients.  Set aside. 

Use the shredder blade on your food processor to finely shred the brussels sprouts (many grocery stores sell shredded brussels sprouts if you don't have a food processor).  Toss the brussels sprouts with craisins, nuts, and half the dressing.  Add more dressing as needed to evenly coat everything.  Set aside for ten minutes to let the flavors marry and serve. 


Sunday, November 9, 2014

Goat Cheese Mashed Potatoes

If I had to choose a culinary idol, Ina Garten would be the one to beat.  That woman is just a class act.  Her style of cooking is elegant, classic, and not too fussy, which I love.  


I can't wait to get my hands on a copy of her new cookbook, Make it Ahead. Fortunately for me (while i'm waiting for Christmas!), this month's Food Network Magazine included a few of her all-star make ahead recipes.  My mouth just watered when I saw her Goat Cheese Mashed Potatoes, and I knew I couldn't wait to try the recipe.  


Though I adjusted the recipe slightly (that's what happens when you decide what you're making for dinner after you already went to the store), the results were creamy, with just a slight tang from the goat cheese, savory, and delicious.  I whipped up a batch of Beef Burgundy and served it over the potatoes- the perfect fall dinner. 


This recipe is inspired by Ina Garten's make ahead Goat Cheese Mashed Potatoes.  I adjusted the recipe to a smaller portion, and also altered  the ingredients based on what I had on hand.  Her recipes says you can prepare it up to the baking point, refrigerate it for up to three days, and bake when ready. 

Ingredients (Serves 4):
* 1.5 lb. yukon gold potatoes, chopped (I left the skin on, but peel the potatoes if you prefer a very smooth consistency)
* 2 garlic cloves, minced
*3 oz. plain goat cheese, room temperature
*3 tbsp. butter, divided
* 1/3 c. sour cream
* 1/2 c. half and half
* 2 tbsp. parmesan cheese, grated
* 1 tsp. salt

Preheat the oven to 375.  Add the potatoes sand minced garlic to a pot, season with salt, and add enough water to just cover the potatoes.  Bring to a boil over high heat, then reduce the heat to a simmer and cook unit the potatoes are fork tender (20-25 minutes). 

Drain the potatoes and return to the pot.  Add 2 tablespoons of butter, sour cream, half and half, and crumble in the goat cheese.  Cover the pot for a minute or so, so the butter and cheese will begin to melt.  Mash the potatoes with a potato masher until smooth.  Transfer the potatoes to a small casserole dish and smooth out the top.  Use your fingers to break up the remaining tablespoon of butter and dot over the top.  Top with parmesan cheese and bake until golden; 30-40 minutes.  Enjoy!


Tuesday, November 4, 2014

Grilled Steak Salad

Do you ever think you might just turn into a big leafy green if you eat one more boring salad?  I sure do, especially since I've been upping my produce game lately.  I've made a bad (healthy, but boring) habit of eating the same salad every day for lunch at work, and it's so much harder to eat a cold salad when it's chilly outside. 

Monday night, I planned to eat my Potato Leek soup with a little side salad.  Instead, I ended up cleaning out my fridge and produce bowl, and whipping up this delicious, warm Grilled Steak Salad. 


The cool lettuce in contrast to the warm steak, grilled onions and tomatoes, sweet balsamic, and creamy cheese is a real winner.  I used a tangy garlic and herb Boursin cheese since I had it on hand, but goat cheese or blue cheese would also work wonders. 


Ingredients (serves 2):
*1 lb. steak (I used a thin cut top sirloin)
*1/2 onion, thinly sliced
*1 tomato, quartered
*1/4 c. crumbled garlic herb Boursin cheese
*balsamic reduction
*olive oil cooking spray
*romaine lettuce   
*salt, pepper

Preheat a grill pan over medium heat.  Spray generously with olive oil cooking spray and add onions and tomatoes.  Season with salt and pepper, and cook until the tomatoes have light grill marks and the onions are translucent.  Set aside.

Pat the steak dry with a paper towel. Season generously with salt and pepper, add more cooking spray to the grill pan, and then add the steak.  Cook to your preference (for my thin cut steak, I cooked it three minutes per side).  

To serve, slice the steak thinly against the grain.  Spray the lettuce very lightly with olive oil spray (you can skip this step if you prefer - the balsamic reduction adds lots of flavor).  Top the lettuce with steak, onions, tomatoes, crumbled Boursin, and drizzle lightly with balsamic reduction.  Serve warm.  Enjoy! 


Sunday, November 2, 2014

Creamy Potato Leek Soup

Well it's official: soup season is upon us!  It's so bizarre to me that after an exceptionally warm October, November first showed up and brought along the cool temperatures with it.  I'm pretty excited for the changing seasons, but I do wish there was more of a transition.  The fact that it already snowed in the mountains of NC is making me nervous - I feel like this year will be a cold one! 


But for now, I'm loving the crisp fall air, and thinking up some delicious  meals that will keep me warm from the inside out.  

This Potato Leek soup makes the perfect meal for a cool night.  I used light sour cream in the recipe, so it's actually surprisingly light for such a hearty, creamy soup.  

You will need an immersion blender for this recipe.  I've said it before, and i'll say it again - an immersion blender is an absolute must for soups.  It's still one of my all-time favorite kitchen tools and I use mine regularly! 

Ingredients:
*1 tbsp. butter
*1 tbsp. olive oil
*1.5 lb. yukon gold potatoes (about 4 medium potatoes), cubed
*2 leeks
*1 garlic clove, minced
* 32 oz. chicken stock
*4 oz. (1/2 c.) sour cream
*salt, pepper
* chives for garnish

First prepare the leeks.  Halve them lengthwise and since them thoroughly under running water (dirt tends to hide in the nooks and crannies).  Roughly chop the white and light green parts. 

Heat a stock pot over medium heat and add the butter and olive oil.  Add the leeks, season with salt and pepper, and sauté for 7-8 minutes, or until soft.  Add the garlic and sauté one additional minute.  Add the chicken stock and increase the heat to high.  When the stock is boiling, add the potatoes and reduce the heat to medium low.  Simmer, loosely covered (keep the lid ajar), for 25 minutes, or until the potatoes are fork tender. Puree the soup with an immersion blender until smooth.  Stir in sour cream until it is completely incorporated.  Serve with another dollop of sour cream and chopped chives.  Enjoy! 

Tuesday, October 28, 2014

Stuffed Peppers

Can you believe how quickly October has flown by?  Halloween is just a few days away and I'm ready!  I must have succumbed to Mike's Halloween spirit this year.  It's hard not to when he started quizzing me about my costume choice back in July.

I'm all about a theme, and after I decided to make stuffed peppers for dinner this week, I knew I just had to carve them up like the little pumpkins they were meant to be.

Stuffed peppers are super simple to make, and you can really use whatever filling your heart desires.  Since I'm still on the Weight Watchers wagon, I opted to use fat free ground turkey, fresh veggies, tomato paste for rich flavor, and a cheddar cheese topping for good measure. 

Ingredients:
* 6 peppers
* 1 lb. ground turkey or beef
* 1/2 onion, chopped
*1 plum tomato, chopped
* 1/4 tsp. garlic powder
*2 tbsp. tomato paste
* 1/4 c. water
* 1 c. spinach, roughly chopped
*salt, pepper
* 10 oz. brown rice, cooked (I used a frozen pouch of Trader Joe's brown rice)
*4 oz. cheddar cheese, grated (I used white cheddar)

To carve the peppers, use a small pairing knife or pumpkin cutter to cut faces in the whole peppers.  After you make the faces, cut off the lid as you would a pumpkin and remove the seeds and as much of the ribs as possible.  Boil the peppers in water for 5 minutes, then remove with a slotted spoon and set aside to cool. 

Preheat the oven to 375.  To prepare the filling, spray a large skillet with cooking spray, heat to medium high and add the onions.  Saute until the onions are translucent, then add the turkey.  Season with salt, pepper, and garlic powder, and use a wooden spoon to break up the turkey as it cooks.  Add the tomatoes, tomato paste, and spinach, and saute until the spinach has wilted and tomato paste is totally mixed in.  Stir in the brown rice. 

Fill each pepper with the turkey mixture, and top with grated cheese.  Place the stuffed peppers in a casserole dish and bake for 15-20 minutes, or until the cheese is totally  melted and bubbly.  Let rest for 5 minutes before serving.  Enjoy! 

Sunday, October 26, 2014

Pumpkin Muffins with Cream Cheese Frosting

I have to admit, i'm not one of those people that gets super excited about pumpkin.  You know the type - the ones who anxiously countdown to the day Starbucks brings back the Pumpkin Spice Latte, or the people who buy Trader Joe's pumpkin bread mix in bulk, for fear they may one day sell out.  

These Pumpkin Muffins with Cream Cheese Frosting are the exception.  My mother has been making these for years, and it just doesn't feel like fall until I make my first batch.  With lots of pumpkin goodness and just the right hint of warm spice from the cinnamon and nutmeg, these muffins make the perfect breakfast, dessert, or mid day snack.  

In my opinion, the cream cheese frosting puts them over the edge, but sometimes I leave a few unfrosted and eat them warm with butter for breakfast.  


Ingredients (makes 18 muffins):
* 1 cup canned pumpkin **
* 1 stick butter, melted
* 1/3 c. orange juice
* 2 eggs, at room temperature
* 1 2/3 c. flour
* 1 1/2 c. sugar
* 1 tsp. baking soda
* 3/4 tsp salt
* 1/2 tsp. cinnamon
* 1/2 tsp. freshly grated nutmeg

Frosting:
* 1 (8 oz) package cream cheese, at room temperature
*2 sticks butter, at room temperature
* 1/2 box powdered sugar
* 1 tsp. vanilla

Preheat the oven to 375.  To prepare the muffins, beat together pumpkin, juice, and eggs.  Add all remaining ingredients and beat until smooth. Spray a muffin tin with cooking spray (you can also use paper liners) and fill about half way with batter.  Bake 10-12 minutes, or until a toothpick inserted in the center of the muffin comes out clean.  Cool on a wire rack. 

To prepare the frosting, beat together cream cheese, butter, and vanilla, until well combined.  Add the powdered sugar in gradually while the mixer is running.  Taste the frosting and add more sugar if needed.   Top each cooled muffin with frosting.  Enjoy!

** Blogger confession: about every other time I make this recipe, I put in a whole can (15 oz) of pumpkin (instead of one cup) by mistake.  If you make the same mistake, cook the muffins up to 18 minutes.  They will still be delicious, but a bit more dense! 

If you're looking for some more Halloween inspiration, check out my post for Focus on the Coast - Forbidden Apples!


Sunday, October 19, 2014

Weekend Update: Double Weddings

Happy Monday!  I'm moving a little slower than usual after a big weekend of fun - including tag teaming two fabulous weddings in one night!

My sister came in Friday night from Atlanta and we decided to have a chill night by the fire pit.  I'm loving the cooler weather!  I used my leftover Greek Dressing to marinate beef and chicken, then whipped up some homemade tzatziki for dipping.  It was the perfect casual Friday night dinner, served with pita bread, feta chunks drizzled with olive oil, and carrot sticks (because you need as many vessels as possible for the tzatziki).  


My brother-in-law, James, came by as well, so we had a big family picnic table party!  We're in the process of building a patio.  I can't wait to have a better outdoor space for the firepit and picnic table. 


Saturday night we had TWO weddings to go to.  I hate that we had to miss a bit of each, but I think we did pretty well considering.  Fortunately they were only about five minutes away from each other, so we didn't have to miss too much.

Saturday could not have been a more perfect day for a wedding.  There was a gorgeous golden hour and the temperature was so ideal.
 My only regret was not taking my real camera!  Both weddings were absolutely stunning, I wish I had better pics to share.
 I have to throw this photo strip in for good measure.  My friends Stephanie and Jim just moved to Japan and really hated to miss the wedding.  I brought along cardboard cutouts of them for photo ops - everyone was so excited to see them (even if they were on popsicle sticks!).  We ended up adding the cutouts to the photobooth props so everyone could get a pic with them.  Too funny!
 
Now if only I had one more day to recover.... a girl can dream!